Speech To Text Awesomeness in Siebel Open UI - Part 2
Welcome back to the second and final part of our speech to text tutorial (complete with awesome fonts).
In the first part, we created a custom PR for the Contact Form Applet and put all the Font Awesome files in the right places.
Today it's time to tackle the PR code in earnest. Remember we want to achieve the following:


In the first part, we created a custom PR for the Contact Form Applet and put all the Font Awesome files in the right places.
Today it's time to tackle the PR code in earnest. Remember we want to achieve the following:
- Display a microphone button in a text field using a scalable icon by Font Awesome
- Allow speech input using the HTML5 Web Speech API
- Animate the microphone icon during recording with CSS animation
- Write the recognized text to a field according using the Siebel Open UI API (of course)
- Play back the recorded text using the HTML5 Speech Synthesis API
So let's open our primordial physical renderer and implement the following code inside the ShowUI method:
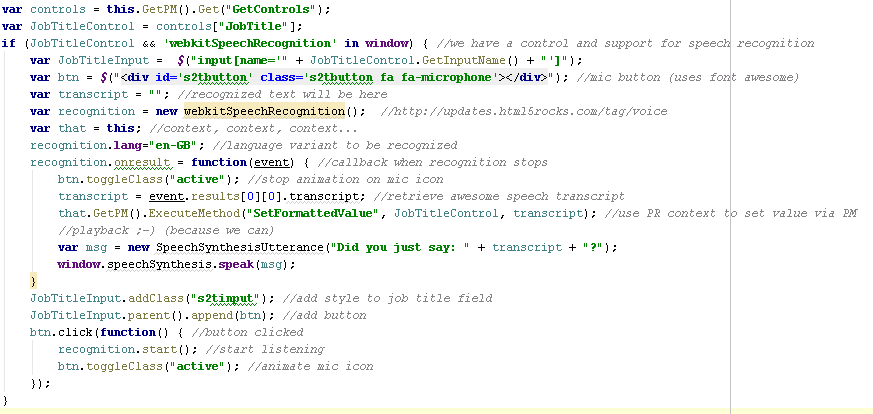 |
| Click to enlarge (yeah I know, it's just a screenshot) Grab the full code here. |
Let's walk through the code line by line:
- First, we 'get' the GetControls property to initialize the controls variable with the current array of applet controls.
- Then we obtain a handle on the JobTitle control as the JobTitleControl variable.
- The if block helps us to verify that the JobTitle control exists and that the browser supports the HTML5 Speech Recognition API with this code:
if (JobTitleControl && 'webkitSpeechRecognition' in window) {In case the window object does not 'know' of the webkitSpeechRecognition method, the code within the if block is not executed (i.e. nothing happens). - If we have speech recognition, we do the following:
- Get the value of the name attribute of the JobTitle control (i.e. the Id) and use it to create a jQuery selector.
- Create a new DIV element with the class attribute set to s2tbutton fa fa-microphone. The fa (Font Awesome) class is necessary that the DIV displays a microphone icon.
- Now we create a webkitSpeechRecognition object using the line
var recognition = new webkitSpeechRecognition();The object has various methods, one of which allow to set the code for the language to be interpreted. In our example we set recognition.lang="en-GB" to interpret the spoken text as British English. - Using the onresult event handler we can define a function that is invoked when the recognition process ends. But first let's stay outside this function as it is not invoked yet (this happens when a recording ends).
- Next we add a custom class to the JobTitle control to allow custom styling.
- Then we use the jQuery append method to add the button DIV to the control's parent element.
- Finally we define a click event handler on the button which does two things:
- Start the recognition (this will cause the browser to display an 'allow/deny' prompt to the user).
- Toggle the button class to allow some animation.
- Let's look back at the onresult event handler function and imagine that speech recognition has ended. Then we do the following:
- Toggle the active class on the button (to end the animation)
- Get the transcript (the recognized text) from the event object (quite a stretch)
- Execute the SetFormattedValue method on the PM, passing the JobTitle control object and the recognized text as follows:
that.GetPM().ExecuteMethod("SetFormattedValue", JobTitleControl, transcript);After consulting with fellow author Duncan Ford and the Siebel Open UI development team, this is the right way to "set a field value". The SetFormattedValue method triggers all the right spots in the framework. Remember, we should stay away from interacting directly with the BC. - The rest is just for fun and plays back the recognized text with a default synthesized voice:
var msg = new SpeechSynthesisUtterance("Did you just say: " + transcript + "?");window.speechSynthesis.speak(msg);
As you see in the example code, there are some class references, so let's add the following CSS rules to a custom style sheet:
/* Text 2 Speech */
.s2tbutton {
position: relative;
right: 13px;
top: 2px;
font-size: 8pt;
cursor: pointer;
}
.s2tbutton.active{
text-shadow: 0px 0px 7px rgba(255,0,0,0.9);
color: red;
-webkit-animation: throbber 1s .165s infinite steps(3);
}
.s2tinput{
width: 120px!important;
text-transform: capitalize;
}
@-webkit-keyframes throbber {
0% {color: #000;}
33% {color: #f00;}
100% {color: #000;}
}
The s2tbutton class controls the appearance of the idle microphone button.
The s2tbutton.active rule defines a red shadow and font color. Using the -webkit-animation property we define a 'throbber' animation that has a 1 second duration and loops ad infinitum through three steps. The steps are defined using the webkit-keyframes "at-rule", so that the color goes from black to red and back. Thanks to Duncan for this cool animation.
The s2tinput class controls the appearance of the JobTitle control which we make a bit wider and apply capitalization to the text (because the speech recognition actually returns lowercase text).
Finally, let's fire up Google Chrome for a test.
The screenshot shows the Siebel client after clicking the microphone button (which is 'throbbing'). The browser prompts for allowance or denial.
Once we click the Allow button we can say the text, for example "Vice President"
A few moments after we stop speaking, the recognized text (not always exactly what you've said, but this time it's ok :) is set as the new field value.
Summary
What started as a simple demo with one line of code (that got deprecated) became a veritable journey into HTML5 speech recognition and synthesis. We added some (font) awesomeness to it by using a scalable icon which we animated with CSS.
For real life scenarios, I think that especially mobile users would benefit a lot from speech input, even more for longer text. It would also be interesting to explore all the options of the speech API such as allowing the user to select the spoken language or displaying the text as she or he speaks.
have a nice day
@lex


תגובות
הוסף רשומת תגובה